Online Bike Coach

Where Cyclists and Triathletes get Faster/Stronger/Leaner/Sooner

  • Shop
  • Contact Us
  • What we do.
  • How we do it.
  • Why it works.
  • Who we are.
  • What you’ll need.
  • Let’s get started.
  • Blog
  • My account

Jan 26 2025

The OBC Dicta

The OBC Dicta (or, The Nine Commandments for Peak Performance In Cycling).

*** I wrote the first version of this over twenty years ago, hoping that it would become the foundation for another book, but life and acceleration got in the way, and I just found it again in my Google Drive.

A ‘Dicta‘ is defined as a series of statements that are sort-of Universally Accepted Comments or Commandments. The following Principles are nothing new, but they need to be plastered on a wall or a screen somewhere, frequently, to remind you of the ‘why’ behind the ‘what’ that we are doing at Online Bike Coach.

(By the way – the whole ‘Dicta’ theme is something I got from my interest in fighter aviation and history. It’s based on an early pioneer in fighter aviation and tactics, Oswald Boelke.

So in their entirety, and updated for relevance, I present my updated ‘OBC Dicta‘.

OBC Dicta #1: IMPROVE YOUR RELATIVE VO2 MAX (rVo2Max).

Garmin Vo2Max 1040
The type of work you do when cycling dictates the gains and losses of Vo2Max. The Garmin algorithm seems to track FAIRLY WELL for me, against the Vo2master gas exchange analyzer. ***What you don’t see in this chart is the subsequent DECLINE in VO2max in the following four weeks. Vo2max needs to rise and fall like a seasonal tide. As I write this, I’m at about 53ml/kg/min, but it’s January, and I’m working my way back up for spring.

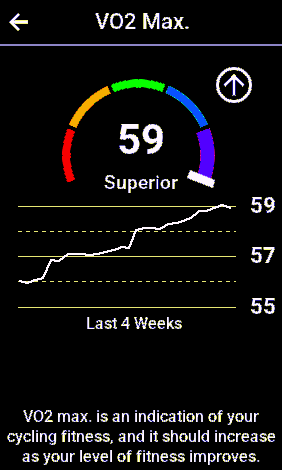
Vo2max translated means “Maximal Volume of Oxygen Absorption”. When you study the number in a laboratory setting, it is translated into “milliliters of oxygen, per kilogram of body weight, per minute” (w/kg/min). So, it’s based on absorption of oxygen, weight, and time. When we perform intervals that are hard as heck, and last maybe 2 to 6 minutes, total, we’re working on optimizing rVo2max.

When you improve your ability to process oxygen, you actually improve your ability to create energy at the cellular level, and thus ride stronger and faster with the same, or even less effort. If you’re like most of us, and you need to lose a few pounds, well, that’ll only help. W/Kg Babeee!

OBC Dicta #2: Raise Your Wattage at Lactate Threshold (wLT), VT2 (Ventilatory Threshold Breakpoint 2), or Functional Threshold/Critical Power, to the highest feasible value, relative to body weight.

Garmin Connect FTP Chart
The way I describe FTP is as such: It’s the power and cardiovascular output, ABOVE WHICH, you are on ‘Borrowed Time’. This can be measured in minutes and seconds. BELOW this value, you can ride much longer. Raise this value through proper training and consistency. Your speed and stamina will improve significantly.

Raising your ability to generate power at Threshold does wonders for your body’s economy, not to mention increasing your ability to ride faster BELOW threshold, for longer periods of time. The old-school method of wLT training was to perform longer intervals, but, surprise!

Shorter, more intense intervals at wattage levels ABOVE Lactate Threshold generate these little molecules call “Monocarboxylate Transporters” – let’s just call them “MCT’s”. More MCT’s in the muscle cells allow your body to purge Lactic Acid from the muscles and into the bloodstream, where it is processed into other forms of useable energy.

How to make more MCT’s? Shorter, more intense intervals (about 2 minutes), with longer periods of recovery in between, about 4 minutes of just glass-pedaling.

OBC Dicta #3: Become as economical a cyclist as possible.

OBC Dicta Base Ride
Under Dr. Bruce Rogers‘ guidance, OBC Clients have had a lot of success with Luisma Gallego’s AlphaHRV Field on Garmin bike computers. Keeping Alpha1 ABOVE a certain value provides assurances that the heart is working efficiently, and you’re thus improving your economy. Do rides like THIS…

No, this doesn’t mean that you have to trade in your LandCruiser for a Hybrid Escape! What it does mean is that you want to save every KiloJoule of energy as possible. By ‘banking’ the KiloJoules, you’ll be ready when the action begins! How to increase your economy?

VOLUME.

OBC Dicta #3 Big Picture
…to get Volume that looks like THIS.

Let’s face it. Time spent on the bike is important, and there IS an aerobic benefit from Long Rides. Your support muscles learn how to suspend your body more efficiently, your legs learn when to pedal and when to coast, and your heart adapts to sustained effort by  growing stronger and more efficient, so that you get more out of every stroke. If you’re a serious cyclist in any of the 3 major disciplines (Road, Track, MTB), you’ll make an effort to perform sustained rides, or try to hit at least 6 hours a week riding “base”. That’s an hour a day, 6 days a week.

Got a job? Try 1 hour every other day, and make up the difference on the weekends. THEN, work on Dicta #1 & #2…

OBC Dicta #4: Recover Nutritionally, Hygienically, Physically, Psychologically, and Spiritually as quickly as possible after every ride.

OBC Dicta: Tracy Recovering with Maple
My first coach, Micah McKee, taught me, “Why stand when you can sit, why sit when you can lie down.” Here’s my wife, recovering with a compression apparatus and our younger Pibble, Maple.

Training can be hell on your body, mind, and spirit. It creates trauma, and the best way to minimize the trauma is through a protocol like this:

              • Drink a nutrient and calorie-dense Sports Nutrition Drink within 15 minutes of the end of your workout.
                This will help you recover more quickly, and move your body towards better adaptation to the loads you have
                just placed it under.
              • Shower off, towel off, hose off, scrub yourself down, brush your teeth, and then get back in to your ‘street’
                clothes. You’ll feel refreshed, minimize decay on your teeth, and you’ll either warm up or cool o, depending
                on your needs. You’ll also be dry, which will require less energy to keep warm.
              • Stretch or practice self-massage after every ride. It’ll help the recovery process, and un-knot those muscles
                you’ve been using so heavily. A regular massage from a professional can also enhance recovery and improve
                performance.

OBC Dicta #5: Blog the Process.


(Click on the image to get a look at my Notes for this ride…)

This has never been easier; Garmin Connect, Ride With GPS, Strava, and tons of others all have areas for post-ride comments. Upload photos, upload screenshots, link to videos, link friends who rode with you or know the route or the ride, and give yourself at least SIX SENTENCES to review the effort and reflect. You’ll appreciate flipping through those notes, I assure you. Use the hours after a ride to comment, reflect, inflect, and project your goals, attitude, highlights, and low points. You may be able to detect trends, which can then be addressed and strengthened or corrected.

OBC Dicta #6: Maintain Strong Bones and Muscles Through Consistent Resistance Training.

Tracy Christenson Resistance Training Book Cover
Shameless Plug; my wife wrote a book about using suspension straps and body weight, to improve fitness for cyclists. It’s cheap, it’s thorough, and it just takes a few minutes every other day.

There is no doubt that we, as endurance athletes, need resistance training to augment our aerobic conditioning. Why? Well, here’s one reason: Research has shown that cyclists tend to be built like birds. We’re prone to osteopenia and osteoporosis on the bones that lay ABOVE the hips, while the bones from the hips down tend to be MORE dense than the average population.

Also, one of the major reasons that cyclists tend to have lower bone densities is that we have the potential to use the calcium in our bones to augment our need for calcium in the muscles, thus robbing Peter to pay Paul. Resistance training, with proper loads and nutrition, will help offset that leaching. Furthermore, training the muscles to re in certain ways will definitely help you increase your performance on the bike. Lastly, it’s my belief that resistance training can help offset muscle fatigue, especially in the core and upper body.

OBC Dicta #7: Develop Explosive Force

Richard Wharton Gold Sprints
“Gold Sprints” REALLY HURT! At 60 seconds in length, they’re arguably too long, but they push past the 8-12 second mark for ATP-CP, and then they push through the PAINFUL 25-seconds of ANAEROBIA, before finally forcing you to hang on for another 35 seconds. It’s not just that max power that matters – it’s how you handle that power decay over time that leads to a rider ‘staying on’ for another challenger.

Every cycling discipline relies on Explosive Force – from the gate dropping in a BMX race, to dropping the hammer in a road race, to cleaning a section of difficult singletrack when mountain biking. Explosive Force is what helps you make a break happen, bridge to a break, and even sprint to the Finish line. The more explosive the Force, the quicker the acceleration. The longer the Explosive Force, the more you can drop your competition. There’s some methodology behind that sprint to the City Limits Sign, so whether you’re solo or in a group, keep it up, keep trying, and give it your all. It’ll yield great dividends.

OBC Dicta #8: Develop the Endurance and Efficiency that are SPECIFIC to Your Chosen Type of Cycling.

Richard and Ryan Seher Bozeman 2001
This is an older photo with one of my ‘kids’, Ryan Seher, when we did a 100-mile ride from the ‘B’ parking lot in Bozeman, out to Livingston, MT and then back along the Interstate. This was a COMPLETELY AEROBIC EVENT.

Road Rallies and Tours take 1-5 hours. Track races are rarely more than 25 minutes long. XC mountain bike races, even among the pros, are in the 90-minute range, and road races for amateurs are usually in the 1-to-3-hour range. Whatever the length of the ride, the more efficient you are at that distance or duration, AT PACE, the faster you’ll travel, with less effort. Again, this can be done on weekend rides, solo or in groups.

Whatever the distance or duration, economy matters, and the only way to do that is to train at that distance or greater, at a speed that’s compatible with your goals. 100 miles at 16mph is more effective than 60 miles at 19mph. Think about the longest organized ride you may do, and train at tempo wattage or pace for AT LEAST that distance, once or twice a week, maybe more, depending on the season. It also helps to train in environmental conditions that are similar to what you’ll experience out in the real world.

OBC Dicta #9: Train Both ALONE and IN GROUPS to Optimize Your Cycling Social Fitness, Your Cycling Mental Fitness, and Your Cycling Physical Fitness.

While a majority of your rides may be solo efforts, just due to work or family conflicts, it’s crucial to remember that cycling is a social sport, and on some levels, it’s a team sport. There are some things you just can’t learn alone in a parking lot, so use group rides to learn the nuanced, indescribable, yet crucial skills that are necessary to safe, effective rides in groups. All that efficiency will fall apart if you end up using your muscles to tense up, lock your jaw and neck, and pretend that you’re in the middle of a group of 18-wheelers bent on your imminent demise.

Find a group that meets your level of fitness and comfort, explain who you are and what you’re trying to accomplish, and ask for HELP. Furthermore, make sure you COMMUNICATE YOUR INTENTIONS. Letting others know where you’re going, what you’re doing, and how you’re doing it will make THEM more comfortable with YOU and will help everyone enjoy the ride more. Lastly, don’t let words or barbs at you, your riding skill level, or your equipment, translate into distraction or lost opportunity. If someone calls you a “squirrel”, ask that person for suggestions on how to avoid the title. It’ll either shut them up or atter them, and you’ll get the help you need. It won’t take long before YOU are the one dishing out the advice or making suggestions.

CONCLUSION

OBC Dicta - Welcome to the Cathedral of Watts
The main thing to take away from this image is this; when you follow the Dicta, you WILL see success. This image is on a Micro scale. The blog post is on a Macro scale. Be consistent, stay focused, be Holistic, and watch what happens.

I’m going to end with a poster that disappeared when I sold Cycling Center Dallas. However, it’s still relevant to this day. I’ve certainly mellowed over time, but the main takeaway is this; becoming a better cyclist takes YEARS. My friend, Craig Fulk, taught me the Parable of “How Do You Eat An Elephant?” “One Bite At A Time.”

Follow the Dicta, and let me show you where I can help you with that, on a Micro and a Macro Scale, and then…

ENJOY THE RIDE!

Share this:

  • Click to share on Facebook (Opens in new window) Facebook
  • Click to share on X (Opens in new window) X

Like this:

Like Loading...

Written by Richard Wharton · Categorized: Garmin Connect, Mountain Biking, Road Cycling · Tagged: bicycling, cycling, Cycling Coach, cycling fitness, Garmin connect, Reno Cycling, Reno Cycling Coach

Dec 17 2024

The Physiological Perspective of Four Separate 8-Minute Intervals

8-Minute Intervals At “Threshold”…

4x8 minute intervals online bike coach richard wharton coach wharton garmin connect
Wattage, heart rate, and Saturated Muscle Oxygen do not always agree. In this blog post, I dive into the physiology of EACH INTERVAL, which gives me greater insight into how to improve workouts for myself and you.

In late November of 2024, I was able to perform an interval session on my indoor trainer and bike with my clients. The workout comprised of four separate 8-minute intervals. We used the VQ Velocity app, and I recorded each interval as a separate file while wearing my Vo2Master Gas Exchange Analyzer. Then, one of my clients, Ken O’Brien, actually coded an app that would allow me to compare the intervals against each other.

Traditional Interpretations of 8-Minute Intervals

When I look at the data from a ride file, I usually use graphs and charts from Garmin Connect. When I ride, I use a Garmin 1040 and the lap button, to assess real-time information. For years, I used wattage and traditional heart rate for each of the 8-minute intervals, but with advanced Heart Rate Variability Analysis, I can now include EPOC, aerobic and anaerobic training effect, and DFAA-1. These values USUALLY yield enough information to determine whether I’m achieving my training goals or not.


Inclusion of Gas-Exchange Analysis in 8-Minute Intervals

Vo2Master App Metrics
This is just one page of data fields that I can use on the Vo2Master app. You can also run these fields as graphs. All of the data is stored in a detailed .csv file that can be downloaded and shared for analysis.

By including data from my Vo2Master gas-exchange analyzer, I wanted to determine whether these traditional metrics were accurate and valid. It’s one thing to get a ‘Score’ or an interpretation of training results from a software with algorithms. These are usually pulled from a EULA that traps metadata and makes suppositions about intensity, dose, and recovery. I find these interpretations to be… shallow. Hence, the need to pull data from the body. 8-minute intervals are long enough to measure metabolic changes via data that I can only get from a breath-by-breath analysis. The goal is to MELD traditional, on-bike data that I can get from my Garmin, with the knowledge gained from the Vo2Master, Moxy monitor, and AlphaHRV.

8-Minute Interval Data

Here’s the link to the 4 x 8-minute interval efforts, along with a chart showing ‘traditional’ averages for Garmin Metrics.

And here is my first summary of the information that I collected.

LapAve HRAve CadenceTorque EffectivenessAve PowerSmO2ThB
11689685%24913.645%12.408
21679584%23815.378%12.369
31659185%23216.307%12.364
41689284%22814.434%12.371

This was where I first began to suspect that some of the ‘Traditional’ parameters for an 8-minute interval might not be as effective as decades of efforts had led me to believe. Now – here is the data from the Vo2Master… Let’s first look at Heart Rate vs. Heart Rate.

This is the graphical data for traditional HR, using the First interval as the benchmark, in black. The following intervals are in red.

For those who are interested, THIS LINK will provide access to these files. For this blog post, the files I’m using are found under ‘select dataset directory’, and are the following:

  • ./Data/RW-11-28-24-Int1
  • ./Data/RW-11-28-24-Int2
  • ./Data/RW-11-28-24-Int3
  • ./Data/RW-11-28-24-Int4

You can certainly play with any of the files, however.

Vo2master heart rate vs heart rate chart 1
Heart rate for the first 8-minute interval is in black. Heart rate for the second interval is in red. You can see a similar pattern.

Here’s the chart comparing the first interval to the third 8-minute interval.

o2master heart rate vs heart rate chart 2
Again, once I get set into the effort, traditional heart rate follows a similar path.

For the fourth interval, there was something that interfered with my final 30-seconds, so the effort was cut slightly short. However, for the 6-minutes in the middle, again, traditional heart rate is similar. Refer to the above table to see just how close the heart rate averages were.

Heart Rate vs. Vo2

Now – here’s a table showing traditional on-bike metrics vs. Vo2Master metrics for each 8-minute interval.

LapAverage Vo2Heart RatePower AverageRespiratory RateSmO2ThB
146.531682494013.645%12.408
244.631672383915.378%12.369
341.981652323516.307%12.364
441.171672283714.434%12.371

And here are some charts comparing different metrics from one interval to the next. Again, I’ll use Interval #1 as the benchmark.

Online Bike Coach Vo2Master 8 Minute Intervals Compared n1
This is a Vo2 comparison of my first and second 8-minute Interval. Black is the first interval, red is the second. The averages are on the table above.

Here’s the first interval against the third interval…

Online Bike Coach Vo2Master 8 Minute Intervals Compared n2
Again, the first interval is in black, while the second is in red. I lost Vo2 intensity and efficiency for roughly equivalent heart rate.

And here’s the first interval against the last interval…

Online Bike Coach Vo2Master 8 Minute Intervals Compared n3
And finally – here’s the last of the four 8-minute intervals. Vo2 was suppressed, as was wattage, but heart rate was not.

Vo2 vs. SmO2 for the 8-Minute Intervals…

Now remember – we’re looking at what wearables are telling us, vs. the outcome. These intervals really were NOT that great for me, but if I want to improve both results and consistency for the time requirement and demands, I really want to dig deep and look at all of the parameters. Here, I have placed Vo2 against SmO2 in the Left Lateralis. Take a look….

Online Bike Coach Vo2Master Moxy Monitor 8 Minute Intervals Compared n1
Rember to use the table a few paragraphs up. There, you’ll see my average SmO2 for each interval. In my opinion, I went WAY too hard for most of the intervals, and ended up fatigued out, which affected the other three efforts. Let’s continue…

Here’s 8-minute interval number 2.

Online Bike Coach Vo2Master Moxy Monitor 8 Minute Intervals Compared n2
This interval is unique because you can see how ‘backing off’ on the intensity, lowered my Vo2, and raised my SmO2, right around Minute 4 to 5. I think this is an important value, which I’ll point out in the following image….

I’m going to show 8-minute interval #2 again, this time with wattage instead of Vo2.

Online Bike Coach Moxy vs wattage 8 Minute Interval n2
I love looking at SmO2 from my Moxy, because it’s consistent, sensitive, and is a fair proxy for VT2 and/or LT2. As you can see, when power (Vo2 is in the previous image), drops as a result of less effort, SmO2 rises, allowing me to witness and recover without losing too much power or intensity. When I rally, Smo2 drops again, but I am better able to find a ‘sweet spot’ of intensity that leads to a sort of ‘Plateau’ for saturated muscle oxygen. By the way – the drop in power at the end is from a hard shift that forced me to stand. It messed up the readings. Don’t Do This!

Here’s the third of the 8-minute intervals, comparing Vo2 to Smo2…

Online Bike Coach Vo2Master Moxy Monitor 8 Minute Intervals Compared n3
By the third interval, I had kind of nailed down the intensity that I was going to be able to sustain more appropriately. Vo2 is more consistent, while SmO2 range is also more consistent.

Now, the 4th 8-minute interval was wonky, and if you look at the right side axis, you’ll see that the scaling is off. You’ll need to refer to the tables, but suffice it to say – SmO2 was fairly low, wattage was compromised, and Vo2 was also compromised. My own interpretation is that I was knackered; fatigued; out of sugar; bonking. But honestly, I don’t really have an answer.

Online Bike Coach Vo2Master Moxy Monitor 8 Minute Intervals Compared n4
Not much to say here, other than I believe the SmO2 sensor CAN give a clear picture, on a Garmin head unit, of those liminal states of intensity, below which (higher SmO2 %) you’re safe, and above which (lower % SmO2), you’re on ‘borrowed time’. I pretty much hit the ‘sweet spot’ via Smo2 (demand) at about the 5-minute mark.

Now, here’s the Crux…

If we use some of these ALGORITHMS that claim to ACCURATELY PREDICT Threshold Power, Functional Threshold Power, VT2, LT2, Critical Power, or whatever, then we depend on them for accuracy, consistency, and repeatability.

But when you look at my tables, and then the graphs, this really is not as accurate as one might be led to believe. The two that I have used extensively in the past, which I won’t name, have my ‘Threshold’ at 270 watts, and 172 beats per minute, per traditional heart rate. These interval intensities were nowhere close. Since 2003, when I first began programming interval sessions for clients using WordPad, I’ve always understood that wattage cannot be the end-all, be-all to training. We have to look at things Holistically.

These wearables, like a Moxy and a modern Garmin or Polar Chest strap, along with 3rd-party Fields, like AlphaHRV (which I did NOT discuss in this post, but will in a follow-up), give us a price-effective way to gain greater insight into EVERY ride, EVERY INTERVAL, and even EVERY BREATH or PEDAL STROKE, down to the second.

I’ll post a follow-up to this post, with some more insights, but I’m at my limits of knowledge here. This is where the ‘Mad Scientist’ always loses out. I need a True Physiologist. Luckily, I’ve got two or ten who share my passion for these Deep Dives, and who can help me understand. I’ll share this information as soon as I can.

Thanks for reading, and

#ENJOYTHERIDE!


Share this:

  • Click to share on Facebook (Opens in new window) Facebook
  • Click to share on X (Opens in new window) X

Like this:

Like Loading...

Written by Richard Wharton · Categorized: DFAA1, Fitness, Garmin Connect, Garmin Fields, Moxy, Vo2 Master · Tagged: AlphaHRV, Bike Coach, Cycling Coach, DFAa-1, Garmin connect, mountain bike coach, Moxy, Peavine, Reno Bike Coach, Reno Cycling Coach, vo2master

Nov 24 2024

Affirming DFAA-1 Aerobic Base With Vo2Master and Moxy

A New Calculation Uses Heart Rate Variability to Better Tune DFAA-1

DFAA-1 with new aerobic floor.
Garmin Connect IQ has an app called ‘AlphaHRV’. This app allows you to set custom floors for different intensities. Here, you can see my DFAA-1 (Alpha-1) is at 1.22, which is above my Aerobic floor. I’m exercising at an aerobic, comfortable, intensity. Zone ‘2’.

I’ve been a big fan of Dr. Bruce Rogers, since 2017. He is a trained MD, but publishes his work in credentialed journals. As a Masters’ level road cyclist, he knows how important heart health is. He is also fully aware of the cardiac risks to endurance athletes. This is why I am impressed with his latest work.

Dr. Rogers began to convince me that DFAA-1 had merit as a non-invasive way to calculate HRV equivalents to Ventilatory Threshold 1 (VT1) and Ventilatory Threshold 2 (VT2), around 2021, when Covid-19 was affecting afflicted athletes. As a Coach, it’s my duty to help my cyclists improve their health and fitness, but in a Holistic way.

Some of you may know that in 2016, a client and I had to perform CPR on another client (he lived). In 2023, a client of mine suffered a heart attack just after a remote class. He also lived, but both are events I never want to see repeated.

In fact, I have changed most of my protocols to include heart-healthy workouts. DFAA-1 is a new way to help everyone ride what I’ll call “Smart” aerobic base. At more intense levels of work, DFAA-1 can help identify ‘Threshold’ on a metabolic, Physiological level, instead of power. Power (watts) is just too immutable, and does not account for myriad other factors that lead to less accuracy in assessing proper intensity.

The ‘Limit’ for DFAA-1 At VT1

Now, remember – the calculation behind this technology is still nascent, but the application is fast-evolving. In 2021, research showed that a DFAA-1 of around 0.75 was fairly close to Ventilatory Threshold 1, or, the point of intensity at which our bodies begin to generate lactate at a higher rate, and thus, use more carbs in in our fuel mix. The original paradigm also set VT2, or the point of intensity at which our bodies begin to create more lactate than can be sustainably processed while staying aerobic, was around 0.5.

Well, the latest research paper from Dr. Rogers shows that there might be a better calculation for DFAA-1 at VT1.

The New Calculation for VT1 via DFAA-1

The goal of this study was to come up with a more accurate way to synchronize heart rate variability, and Ventilatory Threshold 1. What the researchers ended up doing was the following:

  1. They looked at the HIGHEST recorded DFAA-1, usually during warmup or recovery, but it could also be done at rest.
  2. Take this HIGHEST value (in my case, it’s about 1.8), and then ADD the more-traditional value of DFAA-1 at Ventilatory Threshold #2, which is 0.5. The result, in my case, is 2.3.
  3. Use this new Value (2.3), and divide it by 2. The result, again, in my case, would be 1.15.
  4. Use this last value, again, in my case, 1.15, and use THAT as the ‘more accurate’ value for VT1.

When a cyclist or a runner stays ABOVE the new value, they’re working aerobically. Thus, the majority of the gains would be synonymous with the now-ubiquitous ‘Zone 2’ or ‘Base’. Heck, I knew it as ‘LSD’, or Long, Steady Distance, from my days under the tutelage of Sally Edwards and Dr. Ken Cooper (at different times).

Testing the Metabolics of HRVT1

Garmin Connect DFAA-1 Vo2 and Respiration Rate
On this ride, I used my Vo2Master and a Moxy to get more information about the metabolic values associated with DFAA-1 at 1.15 or higher. On this chart, Alpha-1 was mostly at or above 1.2. Respiratory Rate was between 26 and 32. Vo2 was in the mid 30’s. Heart rate averaged 136 BPM.

My clients at my VQ Velocity Virtual Studio are now heavily invested in training with DFAA-1. We have mostly installed the Garmin Connect IQ Field known as “AlphaHRV“, which takes Heart Rate Variability, and calculates DFAA-1. It is accessible within the Garmin Connect ecosystem, displays in real-time, and gets saved in .fit files for post-ride analysis.

I accessed the settings for AlphaHRV within Connect IQ, set VT1 at 1.15, set VT2 at 0.5, saved the settings, and then began my ride with my clients. For 20 minutes, I rode with my Vo2Master mask and Moxy Monitor on my body, while HRV was transmitted by a Polar H10.

Here are the results:

Metric:Alpha1SmO2Vo2MaxTraditional HRWattsAlphaHRV Resp RateVo2Master Resp Rate
Average1.3439%38.561361702626

Honestly, I am MIGHTILY impressed.

  • At 170 watts of power, DFAA-1 averaged 1.34. This is above the 1.15 value I calculated for myself. Ergo, this 20 minute time span was SAFELY within the AEROBIC level of intensity.
  • SmO2 on the Left Lateralis averaged 39%. This dovetails into over 10 years of data collection for myself and clients. For me, 40% is a known ‘Safe’ value for VT1.
  • Vo2 was measured at 38.56ml/kg/min. In the previous two posts, I measured my Vo2Max at 62 or 63ml/kg/min. This value, at 62% of Vo2max, is, Safely within my Aerobic Training Zone.
  • Traditional Heart Rate averaged 136 beats per minute. Earlier this year, I performed a traditional Vo2max test, and the assessment from Vo2Master’s in-house software, showed my VT1 heart rate at roughly 140 beats per minute. Again – 136 bpm is Safely within my Aerobic Training Value.
  • The last two metrics, AlphaHRV’s Respiratory Rate, and Vo2Master’s Respiratory Rate, are values that I included so that I could effectively determine whether the AlphaHRV ‘RR’ calculation was accurate. As you can see – it’s spot-on.
Complimentary physiological metrics to DFAA-1 show heart rate smo2 and garmin firstbeat values
Garmin Connect and FirstBeat metrics complement the DFAA-1 values at VT1. Wattage is in ‘Zone 2’, traditional HR is in ‘Zone 2’, Saturated Muscle Oxygen is stable (green) and high at around 40%. EPOC/Load is at 79, and both Aerobic and Anaerobic Training Effect are in the ‘maintaining’ level of volume. ‘Perf Cond’ at ‘-1’ is honestly pretty good for me, as it tends to drop further and more quickly most of the time that I ride ‘base’. It’s my least-used metric, as it seems the most vague.

A Note About AlphaHRV On Garmin Connect:

Just a quick note: AlphaHRV includes an option for the RESPIRATORY RATE of VT1 and VT2. Now that I know I can breathe at 26 breaths per minute and stay at or below the intensity for VT1, I’ll set it at, say, 27 or 28 breaths per minute, as another Affirming Metric for ‘Base’ training.

Conclusion

Vo2 on screen with a Garmin 1040
Vo2Master has a Field in Garmin Connect IQ that will link their device to a head unit or a watch. A Vo2 of 37-38ml/kg/min fits in with a DFAA-1 above 1.15.

DFAA-1 Continues to reveal more about the human heart and new methods by which measuring HRV can lead to a more scientific approach to cardiac health and fitness. My clients and I are employing AlphaHRV to ever greater effect as we settle into several months of mostly “Base/Zone 2/LSD” training, to give our hearts and bodies a rest, and prepare ourselves for another season of Tempo, Threshold, and Vo2 intervals in 2025. This should result in more fitness capacity over greater ranges and durations, which I hope will lead to more adventures on two wheels, for everyone under my umbrella at Online Bike Coach.

Thanks for Reading, and

ENJOY THE RIDE!


Share this:

  • Click to share on Facebook (Opens in new window) Facebook
  • Click to share on X (Opens in new window) X

Like this:

Like Loading...

Written by Richard Wharton · Categorized: DFAA1, Fitness, Garmin Connect, Moxy · Tagged: Alpha HRV, AlphaHRV, cycling fitness, DFA-Alpha1, DFAa-1, FatMaxxer, Garmin connect, Moxy

Aug 12 2024

Vo2Master Vo2Max Value Affirms Garmin Vo2Max Estimator

Vo2Master’s Vo2Max Value Was 98% Consistent with Garmin

Richard Wharton Vo2Master OBC Headquarters
THE THINGS I DO FOR SCIENCE!

In May of this year, I wrote a post about the Garmin Vo2Max Calculator. In July, I was able to test my Vo2Max at OBC Headquarters, to compare values. I performed a Graded Exercise Test, using the Vo2Master app. This app, on a cell phone, trapped data from multiple sources. The Vo2Master’s Vo2Max value showed a 1-point difference from the calculation to the actual results.

Let’s take a look at what I learned about myself.

Remember – Vo2 is translated into: ‘Volume of Oxygen Consumed’. It’s the rate at which Oxygen is absorbed by the body for use in muscle contraction and life-sustaining activities. The Greeks believed that breath was life… and they were right.

The Vo2Master Provides a TON of information!

Vo2Master App Metrics
This is just one page of data fields that I can use on the Vo2Master app. You can also run these fields as graphs. All of the data is stored in a detailed .csv file that can be downloaded and shared for analysis.

Since it launched over 5 years ago, the Vo2Master app continues to improve. Just about any sports fitness product that has Bluetooth transmission can now be recorded. These myriad data points can also be displayed, in numeric or graphical format. My only complaint about this has been the inability to display and record this information on a larger screen, like that found in a laboratory or on a regular PC. But that’s a side project that I’m actually working on via (fitnesshrv.com). The app can also be simulcast from a phone or tablet to a large screen with 3rd party apps or with Apple TV.

For this test, I recorded the following external data points:

  • Load Generator (Ergometer)
  • Power (crank)
  • Heart Rate (chest strap)
  • Heart Rate Variability (HRV)
  • Cadence (crank)
  • SmO2 (Moxy)

These data points allow me to transfer the information learned in from the Vo2Master, over to my body and bike when I’m cycling outdoors.

For the ‘Native’ Vo2Master data, I recorded:

  • Respiratory Frequency
  • Tidal Volume
  • Ventilatory Exhalation in Liters per Minute
  • Expired Oxygen

ALL of this information was recorded on a single .csv file, and a summary report was delivered after the test ended.

Any information that was able to be transmitted via Ant+ signal, was also recorded on my Garmin Head Unit.

Vo2Max Test Parameters

I can build just about any test protocol I wish to construct, but the most common Graded Exercise Tests for Vo2Max are built like this:

  • A decent warmup that includes instrument and ergometer calibration to ensure accuracy.
  • 2-4 minute stages at preset wattage loads.
  • A 25 to 30-watt jump (“step”) at the end of each stage.
Vo2Master Graded Exercise Test App Protocol
The Vo2Master app can perform Graded Exercise Tests, ‘5-1-5’ type tests, and even training intervals. Variations within each set are based on time and intensity.

For this test, I had already warmed up, so I just chose a 5-minute warmup, 3-minute stages, and a 30-watt jump in each step.

The Test

Vo2Master Graded Exercise Test
The area in grey is the exercise load. Purple is the power coming off of my power meter on my bike. Red is my traditional heart rate. Blue is the Vo2 data coming from the Vo2Master.

The test was performed on July 14th of 2024. The previous week, Garmin Connect had my Vo2Max calculated at 57ml/kg/min. The Primary goal was to determine the accuracy of this number. The secondary goal was to determine Ventilatory Threshold #1 (VT1) and Ventilatory Threshold #2 (VT2) to see if those wattage, heart rate, and other physiological results, were in-line with the Calculations made by Garmin Connect.

*** Remember – this is just ONE individual performing ONE Graded Exercise Test. There’s nothing linear or broad. I’ll add to this information over time, but it’s just a snapshot of my fitness, compared to a mathematical algorithm by a fitness company.

I began the test at 100 watts of resistance, which was then raised by 30 watts every 3 minutes. I ended the test at roughly 300 watts of ergometer load, when I was exhausted, and my Max Heart Rate was at a value I hadn’t seen in about 6 months.

A Few Problems with the Data

When you look at the graphs I’m providing, you’ll see that there are two problems with the data, neither of which is enough to discount the information in it, but it IS important to understand the results.

Vo2master test anomalies
I’ll perform this test again some time, using an axle or spider based power meter. I may also acquire the ‘other half’ of the power meter (the left leg – this is a rare, right-leg-only pm), and show why 2-legged pm’s are so much better.

First – there’s a glaring delta between the Ergometer Load and the Power generated. Those two values should be roughly 1:1 (Power should be roughly equal to the resistance provided, per Newton’s Third Law). The Power lagged behind the Ergometer load the entire ride, even after calibrating both devices. I believe the data from the power meter is accurate, however, and it’s the information I would use outdoors or in training. So, while it’s not in line with load, it does still provide valid data.

Second – the power line itself is variable. I blame this on the fact that I use a one-legged power meter indoors, and the data packets can ‘speed up’ or ‘fall behind’ at certain cadences. I’m fully aware of the shortcomings of one-legged powermeters, which is why, when I ride outdoors, I truly prefer axle-based powermeters, and more specifically, ‘two-legged’ power meters that trap the torque on both cranks, and use the information to compute a more accurate and thorough set of data.

For this test, the average for each step was fine, but in the future, I will make two specific changes. I’m going to purchase a more modern trainer, and I’ll purchase the ‘other leg’ of my power meter, so I can get the more accurate information for my indoor-only bike.

Vo2Max Results

The most important question I wanted to know was what the Vo2Master would show my Vo2Max to be, and what that value was in relation to the calculated estimation of Vo2Max from Garmin Connect.

Here are the results:

Vo2master Vo2max Graded Exercise Test Report Results
This is the first page of the Graded Exercise Test Report from Vo2Master. I basically blew a 56 Vo2, which lines up with the calculation that my Garmin Connect has made, at 57 just a week before.

The Vo2Master trapped my Vo2Max at 55.8 milliliters of oxygen consumed per kilogram of body weight per minute of exertion.

Garmin Connect had recorded a 57 about a week earlier. That’s 98% consistent.

I’ll Take it.

Other Fitness Data Points

If you know anything about me, you know I’m a nerd for Data. The goal for me as a Coach, however, is to help ‘distill’ this information in to practical knowledge. That’s why I focus on lower-cost alternatives and Garmin Connect, to set fitness levels, training zones, and fitness programs. Progression does require frequent re-assessment, however, which is why I like using the Vo2Master. It provides the ultimate, scientifically validated information that we can then use to reset these zones with more accuracy.

Vo2master Heart Rate Vs Wattage Graph with VT1 and VT2
The linear plot between heart rate and wattage is nice, but it’s even better when you plot VT1 and VT2 against the other two metrics. This gives you the knowledge to understand just how ‘hard’ you can ride before physiological and metabolic changes in energy consumption start to occur.

Ventilatory Threshold 1 (VT1)

Ventilatory Threshold 1 (VT1) is a point in time where the Respiratory Rate (RR) or Ventilatory Exhalation (VE) in Liters per Minute, outpaces the rise in Vo2. It is ROUGHLY analogous to Lactate Deflection Point #1, which is an invasive measurement that uses needles and blood to assess the processing of lactate as energy. When that value rises, exercise physiology changes energy use from mostly fat consumption – to fat and carbs consumption, to overwhelmingly carb use for energy. Lactate testing is invasive, adds risk, and the data collection is prone to error. As a result, I use Saturated Muscle Oxygen from a Moxy, and I also use DFAA-1, a measurement that looks at Heart Rate Variability, to assess these intensities, when I’m not wearing a Vo2Master.

Vo2master Gas Exchange FeO2 and EqO2
While I’m not discussing this chart in this blog, the information it’s providing is priceless. FeO2 is expired oxygen. If less o2 is exhaled, that means more is in the bloodstream and is helping the muscles with contraction. It shows the ‘Air’ in ‘Aerobic’ Exercise!

The Garmin Connect system, paired with Garmin bike computers and watches, uses power, heart rate, heart rate variability, respiratory rate from the chest strap, and weather information, to come up with heart rate and wattage zones. These values CHANGE with changes in volume and intensity over time, which is one more reason why I’m intrigued with what the Vo2Master has to say, in relation to the zones set by Garmin Connect.

Garmin Connect Algorithm Vs. Vo2Master Gas Exchange Results

Vo2master with Tidal Volume Ventilatory Exhalation and Respiratory Frequency
Here’s another Graph of the Vo2Master data plot. My Tidal Volume, at 3.7 liters, is actually a bit low; I need to train for deeper, slower breathing. This will delay the onset of VT1 and VT2, and thus improve my economy.

Here’s the comparison between the Vo2Master Zones, and the Garmin Zones after the test.

VT1/Zone 2 ‘Fat Burning’ Zone…

  • Vo2Master: 142 Beats Per Minute for VT1. Below that value, let’s call it ‘Zone 2’
  • Garmin Connect: 145 Beats Per Minute.
  • That’s a 2% difference.
  • VT1 Wattage Value? 183 watts
  • Zone 2 Upper Value for Garmin Connect: 179 watts.
  • That’s a 2% difference…

VT2/Functional Threshold Heart Rate and Power…

  • Vo2Master: 174 Beats per Minute. This is the ‘zone’ above which you’re on borrowed time, and below which, you can still exercise for an extended duration.
  • Garmin Connect? 172 Beats per Minute.
  • 1% delta. Again – I’ll take it.
  • Vo2Master Wattage at VT2/Threshold? 251 Watts.
  • Garmin Connect? 247 Watts.
  • A 1.5% delta. Again – for fitness purposes, I’ll take it.

Setting SmO2 Zones Based on Vo2Master Data

Once the VT1 and VT2 Values for wattage and traditional heart rate were set, I then took a look at the Saturated Muscle Oxygen information at those breakpoints.

Vo2master With SmO2 and ThB Values from a moxy monitor
I love, love, love my Moxy Monitors. They offer a noninvasive way to measure intensity on the ‘demand’ side, while heart rate provides information on the ‘supply’ side. Note the inclusion of Total Hemoglobin, or ThB. Thb declines until I reach VT1, then plateaus in my ‘tempo zone’, then begins to rise as I surpass Functional Threshold Power, or VT2.

Here’s what it showed:

  • SmO2 at VT1, where heart rate was 142 bpm and wattage was 183 watts, showed 37% saturation on my Left Lateralis. I usually use 40% saturation as my VT1/LT1/Zone2 breakpoint, so this value is in sync with my perception.
  • SmO2 at VT2, where heart rate was 174 and wattage was at 251 watts, was at 19% SmO2 Saturation. Again – I tend to use 20% saturation as the mark for my VT2/LT2/Threshold.
  • SmO2 measured by a Moxy on my Left Lateralis, showed highly correlated values with VT1 and VT2 for wattage and heart rate. That’s now three datapoints I can use when training, indoors and out, to correlate with the Gold Standard of Gas Exchange Analysis.

There are some great studies which show how SmO2 is equally valid to Lactate testing. The advantage is that SmO2 is noninvasive. I use SmO2 daily, and rely on it for optimal warmup and vasodilation, as well as for monitoring hydration and even looking at Moxy highs and lows during intervals, to gauge exhaustion more accurately. Most of you reading this already have a Garmin watch or bike computer and an advanced chest strap. Investing in a Moxy can augment your knowledge and improve upon your intuition about intensities and the duration you can ride at those levels.

Conclusion

Vo2Master GXT Zone Prescription
I usually simplify the 5 zones to just 3. Stay below 142 for base, stay above 174 for Vo2Max intensity, and work intervals above and below 251 and 183 watts (these will change with fitness).

The Vo2Master’s Vo2Max readings confirmed the calculations I am getting from Garmin Connect. Correlation between Vo2Master’s VT1 and VT2 for wattage, heart rate, and Saturated muscle oxygen, was also high.

The Vo2Master is the pinnacle of portable, accurate, physiological testing. I’ll be using it on some outdoor rides on the mountain bike to show just how hard mountain biking is, and how we can use that information to better train and prepare. Perhaps more importantly, at least in my case, the Vo2Max calculated through Garmin Connect, along with the thresholds and zones, means that I can train with higher confidence, knowing that the physiological data backs up Garmin’s claims and assumptions to a really high degree!

Thanks for reading, and #EnjoyTheRide!

Share this:

  • Click to share on Facebook (Opens in new window) Facebook
  • Click to share on X (Opens in new window) X

Like this:

Like Loading...

Written by Richard Wharton · Categorized: Fitness, Garmin Connect, Moxy, Uncategorized, Vo2 Master · Tagged: Bike Coach, Cycling Coach, cycling fitness, Garmin, Garmin connect, Moxy, Richard Wharton, vo2master, Vo2max

Jul 27 2024

Building An MTB Course With Garmin Connect Course Creator

Garmin Connect Course Creator Offers Course Building – But Singletrack Can Be A Challenge

The Garmin Connect Course Creator is yet another of Garmin’s under-utilized features. Other Apps and Software offer Course Creation, like RideWithGPS, but keeping everything inside the Garmin Connect Ecosystem allows for easier transfer to a Garmin Bike Computer or wristwatch. However, it is easier to build a course on known roads or routes. If a cyclist wants to build a Garmin Course for a mountain bike trail, he or she has to be precise, and add in a LOT of waypoints. These waypoints can be a distraction when certain settings are running on Garmin Hardware.

Let’s dig in to the Garmin Connect Course Creator.

Creating a New Course in Garmin Connect Course Creator

I’ll post a caveat to this weblog; GO TO A WEB BROWSER ON A PC OR MAC and use the ‘Big Screen’ version of Garmin Connect. 

Once you’re in Garmin Connect, move the mouse over to the vertical ‘Connect’ drop-down menu of options.

Click on ‘Training & Planning’, then on ‘Courses’. The ‘Courses’ sub-menu will pop up, and you’ll see a list of options, including ‘My Courses’, ‘Favorites’, and ‘Nearby Courses’, where you can see public routes built by other cyclists or afficionados.

I’ve highlighted the course I’m reviewing for this post; the ‘2019 Reno Wheelmen Peavine Classic XC MTB Course – Online Bike Coach Created‘.

When you mouse over the pre-built course, the route pops up on the map overlay, with a summary of distance, meters or feet of climbing, and descent. There’s also the option to ‘Send to device’, which I’ll cover later.

Garmin Connect Course Creator Map 1
Garmin Connect offers a course building feature. Here’s where to find it.

This course is my ‘home’ course, and it’s the one I use for almost all of my training and testing purposes. It’s usually low-traffic, and it can be completed in about 30 minutes for me.


Garmin Connect Routing Options

The first part of the process is to use the ‘Custom’ Drawing Method. Why? Well, sometimes maps are not completely updated; in this case, if I try to follow the ‘Follow Popular Routes’ option, the ‘Halo Trail’, shows an old, dug-up, not-used version of singletrack. This trail is not even called ‘Halo Trail’ at that junction. The trail is called ‘Total Recall’.

Garmin Connect Course Builder Image 2
Sometimes satellite images are not as up to date as maps might be. Here, when the Garmin Routing Option was set to ‘Follow popular routes’, the Purple Trail, known as ‘Halo’, was where the routemaker kept taking me. That trail has been re-routed to the trail that is more prominent (and serpentine). Changing the ‘Routing’ setting to ‘Freehand’ allows a coursemaker to follow the most updated trail for GPS purposes.

In this image, you can see that as I needed more detail, I added more and more waypoints, to stay on the route I wanted.

Garmin Connect Course Creator Waypoints lots of waypoints
To keep the Course as accurate as possible, use LOTS and LOTS of waypoints. Waypoints will create a straight line between them for the course, so add as many as you need for accuracy.

Back On (Single) Track – a KNOWN ‘Track’

Here’s an example of what I like to call ‘Drift’. If you place your waypoints zoomed too far out, then at times, the waypoints will be ‘off the track’. The ‘Course’ in the GPS world, is off from the ‘actual’ course by a few feet. This error DOES add up, and it can make your ride annoying, since the head unit will continually call out the error, and may direct you off the actual singletrack.

Garmin Course Creator Known Trail Drift
Details matter. I had to zoom in on this map, to realize that my waypoints were ‘off’ by just a few meters, and those meters can lead to the Garmin bike computer chirping and redirecting you off the known trail. Use more waypoints, more often, especially in singletrack, and zoom in.

Zoom in and continue to use as many Manually Placed Waypoints as possible, to ensure the greatest accuracy.

One more thing; take a look at the ‘Knuckles’ that have been automatically placed, without a blue-dot waypoint, on this image of the Course Creator. This implies that the App, and corresponding Mapping Service behind or beneath it, recognize this trail as ‘Popular’, and generally follow it through twists and turns.

Automatic Routing on Singletrack is really hit-and-miss, so use Individual Waypoints and Freehand Routing as much as necessary to ensure the most accurate Course.

Looping the Course (Making a Lap) in Garmin Connect Course Creator

Building the Course is definitely tedious, but it’s worth it. Once you’ve finished the Course, get the final waypoint as close to your Start Point as possible, and then click ‘Loop to Start’. This will connect the start to the finish, making each the same waypoint or GPS coordinate.

Garmin Course Creator Loop to Start and Save
When you’re done creating your course, click ‘Loop to Start’ so that the Start and Finish overlap perfectly. Then, ALWAYS and OFTEN, click “Save”, so you won’t lose your work!

ALWAYS click ‘SAVE’!

The ‘CLIMBS’ Button….

Once the Course is saved in Garmin Connect Course Creator, click on the ‘Climbs’ Button, and you’ll get a breakdown of the vertical elevation, as it relates to ‘Category’. Climb Categories are based on % grade, length, and surface type. They’re not especially applicable for this Course, but they can provide some useful information.

Garmin Connect Course Creator Climb Category and Highlight
In the Summary box of the first climb (‘Category 4’), you can see that the average slope is 5.7%, length is 2.46km, and the vertical rise is 144m.


Garmin Connect Course Builder Climb Detail
This detail of the vertical composition of ‘Climb 1’, breaks down the slope percentages. This image also appears on your head unit when climbing, and you can customize that screen to show two fields, like ‘Distance to End’ and ‘Time to End’.

Using the Speed Calculator (Virtual Partner) In Garmin Connect Course Creator

Now, this feature on a course is a little challenging. I need to start with some background.

Per my Strava history, which is NOT Garmin Connect, I’ve ridden this route at least 91 times over the last five years. That would be even higher if I had not moved to Sacramento for 18 months in 2023 and half of 2024. I know that my fastest time on this loop is a 27:10, set in 2020. At the time of this writing, my fastest time this year, four years later, is a 29:36.

A modest improvement would be about 15 seconds on a lap, matching a time from September 0f 2020. So, I’ve set a ‘Goal’ time of 29:17, which translates to 17.6kph. If I achieve this goal, then I can always edit the course, and enter another time, like 29:00 flat.

Garmin Connect Speed Calculator - Virtual Partner Goal Time
Garmin Connect does have segments, which can be ridden and raced, and there are rankings, but that’s another feature to be saved for another day.

“Send to Device” in Course Creator

None of this work bears fruit without having the Course in memory on your Garmin bike Computer. When you’re done with your mountain bike course, ALWAYS click “Send to device”. You’ll get a pop-up asking ‘which device’? Choose your bike head unit, and once again, click, ‘Send to Device’. I prefer using Garmin Express, but it SHOULD sync with Garmin Connect on your Smartphone, and when you sync or turn on the head unit, it should download the course in to your bike computer’s files.

Garmin Connect Send to Device Course Creator
I guess I’m just old school, but I still prefer a cable connection to my 10 series computers for data transfers, and in Garmin World, this means using Garmin Express. You can also use basic Garmin Connect on your smartphone.

I’m going to hold off on the Field Application part of this post, because the intent of this effort was to explain how to build the course itself; not to ride it. I’ll do that part soon.

Stay tuned, and Enjoy the Ride!


Share this:

  • Click to share on Facebook (Opens in new window) Facebook
  • Click to share on X (Opens in new window) X

Like this:

Like Loading...

Written by Richard Wharton · Categorized: Garmin Connect, Mountain Biking · Tagged: Garmin, Garmin connect, mountain biking, Reno Cycling Coach, Reno Mountain Biking

  • 1
  • 2
  • 3
  • …
  • 10
  • Next Page »
  • Shop
  • Contact Us
  • What we do.
  • How we do it.
  • Why it works.
  • Who we are.
  • What you’ll need.
  • Let’s get started.
  • Blog
  • My account

Copyright © 2025 — Online Bike Coach • All rights reserved.

info@onlinebikecoach.com   |   (1) 214-616-9850   |     |  

  • Shop
  • Contact Us
  • What we do.
  • How we do it.
  • Why it works.
  • Who we are.
  • What you’ll need.
  • Let’s get started.
  • Blog
  • My account
%d